mNo edit summary |
No edit summary |
||
| Line 1: | Line 1: | ||
| + | {{Template:Levelinfobox |
||
| − | {|cellspacing="1" cellpadding="1" border="1" |
||
| + | |image = File:A10-3.png |
||
| − | !scope="col"|Difficulty |
||
| + | |imagewidth = 256 |
||
| − | !scope="col"|Par |
||
| ⚫ | |||
| − | |- |
||
| + | |Row 2 title = Par |
||
| ⚫ | |||
| + | |Row 2 info = 6 |
||
| − | |6 |
||
| + | |Game/Type = Action}} |
||
| − | |} |
||
| − | {{Template:Level ImageNeeded}} |
||
| − | |||
==Hint== |
==Hint== |
||
| + | [[File:A10-3_top.png|thumb]] |
||
"This is a test of the emergency Scribblenauts system!" |
"This is a test of the emergency Scribblenauts system!" |
||
==Solutions== |
==Solutions== |
||
| + | '''Solution #1''' |
||
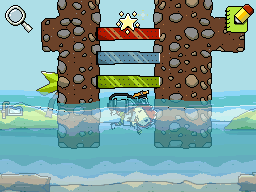
| + | # Place a [[Brick]] on each of the buttons underwater (the same [[Brick]] can be used for each. |
||
| + | # Create a [[Vampire Slayer]] to kill the [[Vampire]] on the right. |
||
| + | # After the [[Vampire]] is dead, move the [[Vampire Slayer]] in with the [[Werewolf]] to kill/distract him. |
||
| + | # Create an [[Engineer]] in with the [[Blue Switch]] where the [[Vampire]] was to toggle it. |
||
| + | # The [[Starite]] will fall in the water. |
||
| + | # [[How to Swim|Swim]] to fetch the [[Starite]] but be sure to avoid the [[Imp]]. |
||
| + | |||
| + | '''Solution #2''' |
||
| − | * Place a [[Brick]] on each of the buttons underwater (the same [[Brick]] can be used for each]]. Create a [[Vampire Slayer]] to kill the [[Vampire]] on the right. After the [[Vampire]] is dead, move the [[Vampire Slayer]] in with the [[Werewolf]] to kill/distract him. Create an [[Engineer]] in with the [[Blue Switch]] where the [[Vampire]] was to toggle it. The [[Starite]] will fall in the water. [[How to Swim|Swim]] to fetch the [[Starite]] but be sure to avoid the [[Imp]]. |
||
| − | + | # Instead of doing that, an alternative is to use [[nothing]] or a [[black hole]] to the job for you. A second after the [[black hole]] touches your enemies, move it to the next victim, so you won't have to create it again. |
|
| + | # In addition, wear [[wings]] and a [[scuba mask]]/[[diving mask]] to turn on the switch, and grab the [[Starite]]. |
||
[[Category:Levels]] |
[[Category:Levels]] |
||
[[Category:Action Levels]] |
[[Category:Action Levels]] |
||
Revision as of 01:26, 6 September 2013
| A10-3 | |
|---|---|
| |
|
Difficulty |
|
|
Par |
6 |
|
Game/Type |
Action |
Hint
"This is a test of the emergency Scribblenauts system!"
Solutions
Solution #1
- Place a Brick on each of the buttons underwater (the same Brick can be used for each.
- Create a Vampire Slayer to kill the Vampire on the right.
- After the Vampire is dead, move the Vampire Slayer in with the Werewolf to kill/distract him.
- Create an Engineer in with the Blue Switch where the Vampire was to toggle it.
- The Starite will fall in the water.
- Swim to fetch the Starite but be sure to avoid the Imp.
Solution #2
- Instead of doing that, an alternative is to use nothing or a black hole to the job for you. A second after the black hole touches your enemies, move it to the next victim, so you won't have to create it again.
- In addition, wear wings and a scuba mask/diving mask to turn on the switch, and grab the Starite.